

As a tennis lover, I derive immense joy from the sport, regardless of my age or skill level. While playing on courts with partners can be exciting, practicing alone has its rewards. What amazes me is that you don’t need a training partner to significantly improve your skills; you can achieve this with a tennis practice wall. With a practice wall, you can work intensively on technique and conditioning without any external assistance or distractions.
In this insightful post, we’ll delve into the world of using a tennis practice wall and discover how it improves your game dramatically. We will explore different types available based on materials and guide you through easy-to-follow steps on building each kind effortlessly to help reduce costs while maximizing benefits. Additionally, we will provide tips that will make every minute of your practice session productive whilst offering answers to some frequently asked questions about having and using such walls advantageously for an excellent performance.
If you are ready to up your game tremendously like I did – then hold on tight! Let’s dive in!
Benefits of Using a Tennis Practice Wall
Using a tennis practice wall yields numerous benefits that aid tennis players in their game. Here are four key advantages of utilizing a tennis practice wall:
- Improves hand-eye coordination by repeatedly hitting the ball against the wall.
- Helps develop ball placement skills as players can aim for specific spots on the wall.
- Enhances ball handling skills since one can hit various types of shots, such as volleys and groundstrokes, against it.
- Great for conditioning purposes because practicing with a tennis practice wall involves continuous movement and repetition.
These benefits make using a tennis practice wall an excellent addition to any training program, regardless of the player’s level or experience. It also allows players to train independently and at their own pace without requiring a partner or coach’s assistance – making it easier to fit into busy schedules!
Hand-eye coordination
When practicing with a tennis practice wall, one major benefit is the improvement of hand-eye coordination. Hitting balls against a wall trains your eyes to track the movement of the ball and adjust your positioning accordingly. This skill is crucial in tennis as it allows you to make contact with the ball more consistently and hit shots accurately.
To maximize the benefits of hand-eye coordination training, try hitting different types of shots against the wall – forehands, backhands, volleys, and serves. Varying your shot selection will challenge your eyes to stay focused on different trajectories and speeds.
Remember to start at a comfortable pace and gradually increase intensity as you improve. Focus on technique first before attempting more challenging drills like rapid-fire hand changeovers or targeting specific areas of the wall.
Overall, a tennis practice wall can be an excellent tool for improving hand-eye coordination for players at all levels.
Ball placement
Practicing with a tennis practice wall is an excellent way to improve your ball placement skills. Hitting against a wall helps players develop accuracy and precision when hitting the ball, which can be difficult to achieve in regular practice sessions. By hitting against a practice wall, players can focus on practicing different shots, such as volleys and overheads, while keeping the ball within specific areas of the court.
To maximize your training results when practicing with a tennis wall, it’s essential to establish certain target zones on the court surface for each type of shot that you are working on. For instance:
- For forehand shots, designate particular zones at various heights and angles where you want to place your shots.
- For backhand shots, create similar zones as you did for forehand shots but placed on the opposite side of the court.
With these designated target zones, hit repeatedly at each spot until you feel confident and comfortable hitting accurately. Additionally, try varying the speed and spin that you place on each stroke so that you become adept at adapting quickly during actual play situations.
Incorporating these practices into your tennis routines will help foster better playing habits throughout games while increasing consistency in pushing yourself towards improvement goals.
Ball handling skills
One of the benefits of practice walls is that they can improve your ball handling skills. With a practice wall, you have the opportunity to repeatedly hit different types of shots and adjust your stroke technique until it becomes second nature. Practicing against a wall allows for more time hitting and less time running after missed balls.
To improve your ball handling skills, try practicing different types of shots such as volleys, groundstrokes, serves, and overheads. As you get comfortable with each shot type, increase the speed and spin on the balls to challenge yourself further.
Additionally, using a tennis practice wall allows you to work on consistency by hitting multiple balls in a row without any breaks for mistakes or picking up additional balls. Overall, incorporating ball handling drills with a tennis practice wall into your training regimen can greatly enhance your overall game.
Conditioning
When it comes to increasing your tennis skills and stamina, utilizing a tennis practice wall is an effective way to achieve just that! By repetitively hitting the ball against the wall, this can aid in enhancing your endurance while also strengthening your muscles. This method of practice can also lead to boosted reflexes and fast-twitch muscles, both of which are crucial for quick movements around the court.
But don’t stop there! To ensure you are maximizing each practice session, mix things up by including a variety of drills that focus on different aspects of conditioning such as footwork and agility training. Don’t be afraid to work on coordination through split steps with quick movements or side-to-side shuffles at the baseline – these drills help build strength endurance.
And if you really want to up your game, consider adding high-intensity interval training (HIIT) workouts into your routine. HIIT exercises like sprints or burpees done between sets can help significantly improve aerobic capacity and overall fitness levels.
By putting in consistent work using a tennis practice wall, players can develop their stamina and reach their goals surrounding conditioning while simultaneously perfecting core skills such as ball placement and hand-eye coordination. So what are you waiting for? Start incorporating this effective method into your routine today!
Types of Tennis Practice Walls
When it comes to tennis practice walls, there are a handful of options available. The most popular ones include wooden, cement, and fiberglass practice walls – each with their own pros and cons. Wooden walls tend to be sturdy and economical, but they demand more maintenance than other varieties. Cement walls provide excellent ball response characteristics but may not hold up as well as the other two materials over time. Fiberglass walls are typically the priciest option, but they boast high resistance against weather conditions and require little upkeep.
It’s important to think carefully before deciding on which type of wall to build in your backyard or local park since the material and shape will affect playability in different ways. Ultimately, the best choice for you boils down to what’s most effective while still remaining within your budget – whether that means investing in higher-quality materials at the outset or picking something less expensive with greater need for routine upkeep over time due largely against signs of wear-and-tear from frequent use.
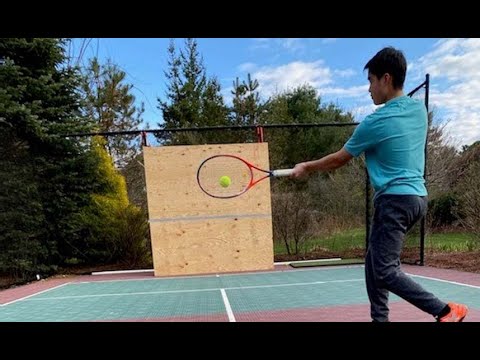
Wooden Tennis Practice Wall
As a tennis enthusiast, I know just how important it is to practice regularly. But let’s face it, not all of us have the budget for expensive equipment. That’s why building a wooden tennis practice wall can be a fantastic option!
One of the biggest advantages of this type of wall is that it won’t burn a hole in your wallet and maintenance costs are minimal! Here’s what you’ll need: 4×4 pressure-treated wood posts, screws, plywood sheets and either tennis ball baskets or wire mesh netting to secure your balls.
First things first – collect all those materials! Then, dig deep holes into the ground for each post. Make sure they are evenly spaced apart from each other and levelled with a nifty tool.
Next up – attach the plywood sheets onto the frame using screws and make sure to space them out correctly so they overlap slightly. This creates an even surface for returning balls.
Finally – affix either your tennis ball baskets or wire mesh netting onto the plywood surface which will hold all of your balls as you strike them against the wall.
Boom! After following these simple steps (with some elbow grease), you’ll have yourself an effective training tool in no time at all. Improve hand-eye coordination, ball placement accuracy and condition yourself like a pro without breaking bank!
Cement Tennis Practice Wall
As someone who takes their tennis game seriously, I know how important it is to have the right practice setup. That’s why I highly recommend going for a cement tennis practice wall if you’re looking for maximum durability and low-maintenance.
This type of wall is constructed using cement blocks and mortar which creates a solid structure that can withstand high-velocity shots without any wear and tear. What’s more, the consistent ball bounce makes it easier to work on your form and master those tricky strokes.
Of course, building a cement tennis practice wall requires some attention to detail. It’s crucial to make sure that the base is level and sturdy from the very start. Laying out the blocks in an interlocking pattern while securing them with mortar will give you added peace of mind. To reinforce its strength even further, adding steel rods behind the top layer would do wonders.
Once all this has been taken care of, it’s time for finishing touches – stucco or concrete! While stucco provides a smooth surface ideal for controlling ball rebound, concrete earns extra points in terms of overall strength.
Overall, investing in a cement tennis practice wall is something every serious player should consider doing. Not only does it help improve hand-eye coordination but also gives you long-lasting benefits compared to other types of walls out there.
Fiberglass Tennis Practice Wall
I absolutely love practicing tennis, but it can be difficult to find a quality practice wall that lasts. That’s why I’ve discovered the wonders of fiberglass as a prime material for constructing practice walls. Not only is it durable and weather-resistant, but fiberglass also boasts effortless customization options thanks to its ability to mold into any shape or size.
The thing about building a perfect fiberglass tennis practice wall is that you don’t need much hassle to get started. The first step involves creating an easily removable mold of your preferred wall design using foam insulation board or similar materials, all while coating it with release agents for added comfort during removal once the fiberglass has cured.
Next up – working in layers! With the mold ready, cover it with alternating layers of matting and resin until desired thickness/strength achieved – use as many as necessary for it! Once fully cured, trim and finalize by erecting wooden frames around the edges towards securing your new masterpiece.
What’s amazing about choosing a fiberglass wall over other alternatives like wood or cement is how easy maintenance becomes on them compared to others – if damage occurs, simply patch holes or cracks with ease!
All things considered; properly constructing a fiberglass tennis practice wall guarantees durability and versatility for all future sessions without significant time spent maintaining said structures. It’s undoubtedly a worthwhile investment every enthusiast out there should make!
How to Build a Wooden Tennis Practice Wall
To build a wooden tennis practice wall, follow these simple steps:
- Choose the location: Find an appropriate location that provides enough space for hitting balls against the wall. Ensure that there is sufficient clearance around it as well.
- Measure and prepare materials: Determine the dimensions of your desired tennis practice wall and buy all necessary materials, including wood planks, nails, screws, eyelets, and netting.
- Build the frame: Use wooden planks to create a sturdy rectangular frame according to your measurements. Secure each plank with nails or screws at equal intervals to reinforce their hold on each other.
- Add netting: Install durable netting across one side of the frame by attaching eyelets along its top edge and then pulling them tightly in place using rope or cords attached to adjacent corners of the frame.
- Attach wooden slats: Starting from below the netting and moving down towards ground level, nail horizontal wooden slats across every few feet of vertical lumber so that they act as backboards when practicing shots against it.
- Finishing touches: Sand down any rough edges or protrusions before painting or staining the finished product in colors of your choice for longevity purposes.
Now you are ready to play against yourself whenever you want!
How to Build a Cement Tennis Practice Wall
To build a cement tennis practice wall, follow these steps:
- Determine the location: Choose an area that provides enough space for the wall and gives players ample room to move around.
- Create a strong foundation: Dig a trench with a depth of at least one foot and lay bricks or pour concrete along its length.
- Build the frame: Construct the wooden frame according to desired dimensions and drill holes in it at appropriate intervals.
- Install rebar framework: Place sturdy metal pipes (rebar) in each hole before filling them with freshly mixed concrete.
- Smooth out the surface: Use a trowel or float to smooth out any bumps or cracks on the surface once the mixture has set but not dried entirely.
- Add finishing touches: Paint lines, massage stakes, and create outlines.
Keep in mind that building a cement practice wall requires precision and expertise, so do your research beforehand, consult professionals, if necessary, and follow all safety precautions when constructing this valuable tool for honing your tennis skills!
How to Build a Fiberglass Tennis Practice Wall
Fiberglass tennis practice walls are a popular choice because of their durability and low maintenance. Here’s how you can build one:
- Start by measuring the area where you want to install the fiberglass panel.
- Purchase a fiberglass panel that fits your desired measurements from a reputable vendor.
- Install pressure-treated wooden posts in the ground at each end of where you plan to place the wall panel.
- Attach metal brackets to the top and bottom of each post, making sure they are level with each other.
- Drill holes into the fiberglass panel near its corners and thread cable ties or ropes through them.
- Lift the panel up into position between the two posts and secure it using cable ties or ropes attached to the metal brackets on either side.
- To add bounce-back capability, purchase rubber strips from your local hardware store and attach them to both sides of the fiberglass panel using heavy-duty adhesive glue.
Once installed, your new fiberglass tennis practice wall will provide an excellent surface for playing solo tennis games, working on hand-eye coordination skills, ball placement accuracy training drills, as well as serve practicing exercises all season long!
Tips and Tricks
Here are some tips and tricks to help you make the most out of your tennis practice wall:
- Mix up your shots: Don’t just focus on one shot or one area of the court. Vary your practice by hitting forehands, backhands, volleys, overheads, and serves from different spots on the court. This will help improve your all-around game.
- Use targets: Create targets on the wall with tape or chalk. This will give you something specific to aim for and help you work on ball placement.
- Signal system: If practicing with a partner, create a hand signal system to communicate which shot or area of the court each person should hit next. This will keep things organized and allow for more efficient use of time.
- Bring a bucket: Be sure to bring a bucket of balls so that you can continuously hit without having to constantly retrieve them.
- Practice footwork: Use the practice wall to work on your footwork as well as your strokes. Move around the court as if you were playing in a real match.
By implementing these tips into your tennis practice routine, you’ll be able to get much more out of using a practice wall.
Frequently Asked Questions
Do I need special equipment to build a tennis practice wall?
You don’t necessarily need specialized gear – just basic tools like a saw, drill, hammer, and nails. But if you’re looking to add features like angled back or side panels, professional assistance or additional equipment might be necessary for this elaborate design.
How much does it cost to build a tennis practice wall?
The cost can vary depending on factors such as the type of materials used or how large and complex you want your design to be. A wood-based practice wall could set you back between $200-$500 (material alone), while cement versions range from $500-$1000.
Can I paint my tennis practice wall?
Sure! You have the option of customizing what outdoor colors you would prefer with weather-resistant paint that allows for personalization along with color-coding different target zones for easier visual focus during playing sessions.
What should I do if my balls fly over the top of the practice wall?
If this occurs, adding height would be necessary so your shots stay within bounds. But make sure not to exceed common regulations for building codes and safety protocol guidelines concerning fence elevations for facilities in local areas.
How long does it take to build a tennis practice wall?
It all depends on numerous factors such as knowing what type of material that will work best for your area’s needs, who builds it – yourself/contractor/team partner which can affect time requirements among other things. One thing is certain though – it could take anywhere from several days up to weeks before completion depending on project size and complexity!